Tag Archives: Fit

Want to look your best? It’s all about fluidity…

Unquestionably the concept of fluidity is the most underrated subject in men’s clothing today. Go back a decade and we had too much fluidity; clothes in general often crossed the line towards being baggy.  Recently of course it’s the exact opposite as silhouettes have become trimmer; often verging on too tight.

Want to look your best?  It’s all about fluidity…

Fluidity

When I talk about fluidity what I’m getting at is how your clothes interact with your body – particularly in movement.  It’s a given that as we move our clothes will inevitably move with us. The key though is that like a good athlete our clothes must move as “quietly and smoothly” as possible with each our movements – regardless of how big or small they are.

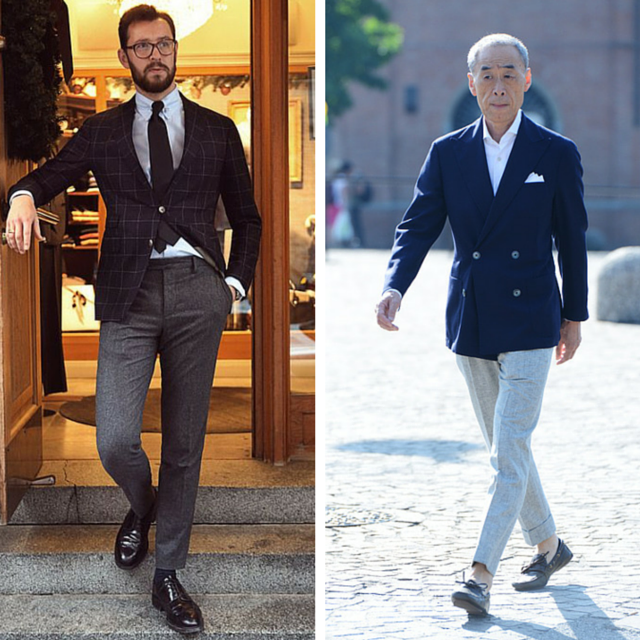
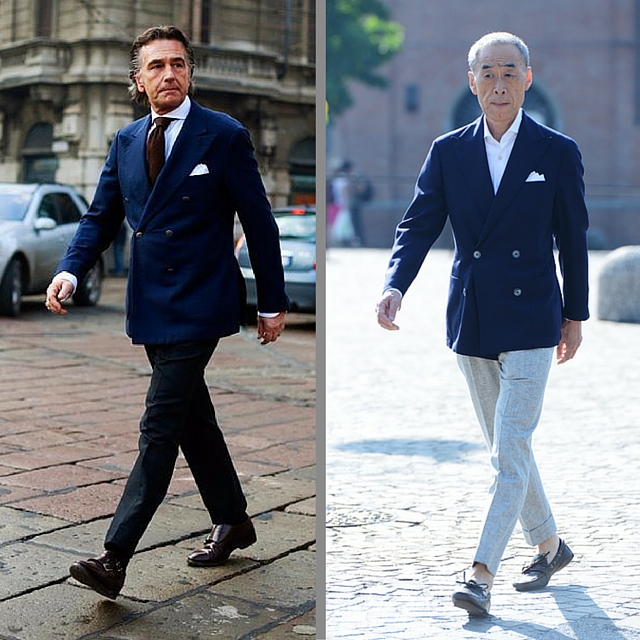
The two images above show this principle perfectly.  Both guys are in full stride yet the clothes show no hint of strain at all – there is a softness and comfort that is almost visible to us.  At the end of the day this more than anything else is exactly the point of tailored clothing.

How clothes interact with your body.

Before I get into what quiet and smooth movement looks like I want to paint a picture of the opposite – of what we could refer to as a “louder” style of movement.

Interestingly the impact of clothes that are too loose and too tight are somewhat similar.  In the case of overly baggy clothing you swim in the excess cloth; the result of this is that all of that extra bulk gathers in certain areas and constantly responds to even the most subtle movements of your body.

Loose II

With clothing that is too tight we see the exact same problem with constant movement; in this case though it’s due to the fact that the clothes are clinging to the body.  The result is that with each movement of the body there is a pull, a twist or a riding up of the garment.

tight fit II

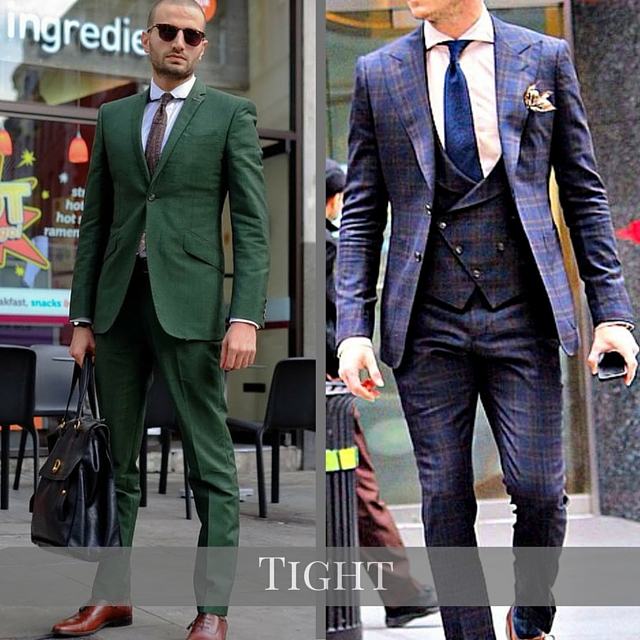
Two different fits with one problem – constant movement.  In the end the wearer has to contend with non-stop fidgeting as they try to control the garment; not exactly pleasant, comfortable or pleasing to the eye.

Fluidity.

To achieve fluidity we need to strike a balance between the two extremes of baggy and tight. As such the aim is to cut a garment that eliminates all unnecessary excess while still having enough of it strategically placed to enable the body to move in an unhindered fashion.  The trick with this is to stick to the “less is more” approach – particularly when dealing with a trimmer silhouette. By that I mean cutting “less” aggressive in terms of how close we fit the garment to the body. It’s important to keep in mind that any hint of strain on the garment when you’re not moving is magnified when you are.  The advertising of modern fashion has made this point very difficult to hammer home; strains and pulls have become the norm on the pages of GQ and on the mannequins in stores. The problem though – neither models or mannequins are required to move.

In the end what we’re really looking for is a general softness in the garment; we want it to move effortlessly with the body as much as necessary but not a hint more.  While a lot of this is achieved by how we cut the pattern for the garment another key element of this is allowing the characteristics of the cloth itself to be expressed.  The drape of the cloth is hugely important and by allowing it some room to breath in relation to the body the overall garment will often appear slimmer than it actually is.

perfect

It is this aspect of the tailoring game which can become quite addictive.  Every aspect is a process and an evolution whereby the tailor and the client collaborate to strike the perfect balance in terms of how the clothes look and feel.  Add a half here, take away a quarter inch there – it’s the little details that make the difference.

As always I’d love to hear your opinions on this or any sartorial subject for that matter.  Better yet book a free appointment and we can banter in person and see if we might be a good fit to work together.

Take care – Michael

info@martinfishertailors.com


The New Phase: Introducing Relaxed Trim…

Finally.

I’m glad to report that after years of clothing getting tighter and more shrunken we’re finally starting to experience a shift towards a softer more relaxed silhouette. No question trimmer and slimmer is still the dominant look; however the needle is slowly moving back towards a middle ground that is frankly where we should’ve always been.

tighter versus relaxed

The images above are an example of the two silhouettes we’ll be discussing in this article.  On the left is a good example of the very fitted, shrunken look that has been so prevalent in men’s tailoring over the last few years.  Notice the shorter jacket, the lack of ease around the button stance and the very fitted midsection and thighs on the pants.  On the right is the more relaxed silhouette that seems to be gaining some momentum as of late.  While still trim everything is just a hair looser which adds a more relaxed and comfortable appearance to the wearer.  The biggest distinction between the two looks is the relative fluidity of the clothing – very little is seen on the left whereas on the right you can almost see it flowing over his body.

A round peg in a square hole.

As much as we in the tailoring game like to think we’re above the influence of “fashion” we couldn’t be more wrong.  The Thom Browne inspired shrunken-look of the last decade has completely changed men’s fashion – it was a swing so drastic that everyone seemingly got caught up in it.  Undoubtedly the trim and extremely fitted look is great on few specific body types.  The problem though is that it is completely wrong for a far wider range of bodies.  The result was that for every guy you saw that looked good there was inevitably three guys that appeared squished into a suit that was a size too small.

Below are two examples of the look done right.

fitted done well

Next however are two examples of where the overly fitted look can go wrong.

too fitted

On the hole the tighter aesthetic led to a very stiff and rigid appearance where the fluidity of the clothing over the body was sacrificed.  The body in this situation was simply restricted by the clothes which in turn led to a more unnatural appearance.  It is a look that works beautifully on tall, long, lean bodies that aren’t overly muscle bound.  This is because the garment can be cut close to the body because the muscles and frame have very little expansion thus movement isn’t compromised that much.

For guys with muscles and curves though the game is completely different.  When cutting clothes for these type of bodies we have to make sure there is enough ease to account for the expansion of the muscles as you sit or move your arms forward.  At the height of the tightness phase the type of body one had didn’t seem to matter – clients would often desire a fit that made basic movements difficult and would want the stress marks as they viewed them as the mark of a good fit.

Introducing relaxed trim.

This shift towards the middle ground is what I refer to as relaxed trim.  It isn’t a drastic shift but then subtlety is everything in men’s clothing.  Adding a 1/2″ here, shifting a 1/4″ there – these subtle changes have a very real impact on how clothes will fit and feel.  By making the fits a hair less tight we’re able to create a far greater fluidity in how the garment moves with the body.  In conjunction with this there has also been a real shift towards softening the way garments are made – that means reducing the materials used in the making of the garment to make it lighter and more comfortable.

relaxed trim II

Add all this up and we’re seeing a fit that walks the line between comfort and trimness. Anytime we tailor a garment we look for it to be free of stress lines and pulling of any kind.  The focus is on having the garment move fluidly with your body and not restrict any standard movements. The result is much more natural appearance as the body and the cloth move as one – gone is the stiffness and rigidity of the overly tight look.

relaxed trim

More choice, more interesting.

Another important factor is an increase in choice.  From my perspective things got a little boring in terms of variations of tight being the dominant style.  If relaxed trim truly emerges as the new middle ground then we’ll be able to venture either way and still remain on-point.  Slender guys can still ask for a very trim look while bigger guys can add a bit more fullness to balance out their overall size. The big winners though will be those in the middle with their body type – the ability to go trimmer or fuller provides a wealth of different silhouettes at their disposal.

At the end of the day it’s a win-win.  Visually things become more interesting with a wider range of different silhouettes being deemed “in-fashion”.  Furthermore it encompasses a wider range of fits that better serve the myriad of body types that exist.  It allows everyone to get back to dressing based on their bodies attributes which is the number one factor we should all have in mind.  Dressing for fashion despite your body hopefully becomes a thing of the past.

As always I’d love to hear your opinions on this or any sartorial subject for that matter.  Better yet book a free appointment and we can banter in person and see if we might be a good fit to work together.

Take care – Michael

info@martinfishertailors.com


5 Keys To The Perfectly Fitting Jacket

Without a doubt there are a lot of posts on how to achieve the perfectly fitting jacket.  With that in mind I’m going to get a little technical to fill in some of the gaps; use these keys to get very specific the next time you’re purchasing a jacket whether it be with your tailor or straight off-the-rack.

A general point before we get going though; the perfectly fitting jacket should take your general shape.  The days of excessive structure and padding in the jacket are gone.  Instead the aim is to create a shape that softly follows the line of your body and enhances your natural silhouette as opposed to providing you with a new one.

5 Keys To The Perfectly Fitting Jacket

1. Get the shoulder and sleeve treatment right.

Firstly the shoulders set the tone for the jacket.  In terms of pure fit the shoulders of the jacket need to correspond to the natural width of your shoulders.  The seam should sit on or near the outside edge of the shoulder bone while the sleeve line falls smoothly downwards from there. Here is good example of this:

FSD2

And here are two examples to avoid.  On the left is a strained and collapsed upper sleeve due to the shoulders being too narrow; on the right is a protruding shoulder that ‘floats’ due to excess width creating a divot as the shoulder line falls downward.

perfectly fitting jacket

But there is some leeway that can be used to create a subtle visual manipulation.  It comes from finding the right combination between the angle of the shoulder seam and the type of sleeve that is chosen.

With the aforementioned shoulder bone as the guide we can set the sleeve inside, on or outside of this point.  The key in this is subtlety – we’re talking about a total shift of a quarter inch or so. The top image below is set outside thus creating an inward angle from the shoulder to the chest.  The bottom image is an example of an more inside set – the result being a straighter angle from the shoulder to the chest.

perfectly fitting shoulders

Why would we do this?  To manipulate how the shoulders look.  An outside set makes the shoulders look bigger while an inside set makes them look smaller. This is extremely helpful for guys with bigger mid sections – by setting the seam outside we make the shoulders appear wider in relation to the belly which visually slims the overall silhouette.  As for the sleeve – when it’s set inside we need to add fullness to the top of the sleeve so as to allow it to smoothly get over the deltoid muscle and not collapse as seen above.

2.  Get the chest and height of the armhole right.

These are dealt with together due to the fact that the two points come together at virtually the same spot.  The key piece of information though – the higher the armhole the better.  Feeling your armhole is not a bad thing – it should not restrict you in any way but feeling it something that is encouraged.

Why is this?  The higher the armhole the more independent the arms movement is from the rest of the jacket.  With a low armhole the sleeve actually attaches below the chest level thus every time the arms move it pulls at the area around the chest.  The result is a jacket that is constantly shifting and hence uncomfortable.

A secondary aspect of the high cut armhole is that we’re able to achieve a cleaner and trimmer chest as a result; this being due to the fact that the actual armhole itself is cut smaller.  It also allows for a longer line from the bottom of the armhole to the hem of the jacket.  We want this line to be as long as possible because it helps visually elongate the body.  It also enables a more slimming angle towards the button stance than if it began from a lower point.

Untitled design (5)

Apologies for the grainy picture on the left above – fitting that a bad picture is of a bad armhole. Notice the pulling that occurs with the arm slightly raised to enter the pocket.  Compare this to the image on the right which is perfectly clean despite the fact that his hand is raised chest high.

3. Get the button stance right.

The button stance is the narrowest point on the jacket hence it needs to correspond to the narrowest point on the body.  On most of us that means a slightly lower sitting stance; roughly 2-3 inches above the belly button at which point our love handles begin.  Keep in mind that lower is better as it creates a longer “V” from our collar down to the button.  A longer line visually elongates our bodies making us appear slimmer and taller.

low button stance

In terms of width – the button stance should be trim without being tight.  In days gone by the norm used to be that you could fit a full fist between your stomach and the jacket when it was pulled forward; nowadays it’s more like half a fist.  As a loose guide the jacket at the button stance should be between 3 – 4 inches bigger than your belly measurement.  Finding the exact amount is a personal choice – that said keep in mind that too much is sloppy while stress wrinkles from being too tight is simply bad.

4. Get the hip and seat right.

Perhaps the most overlooked aspect of getting a jacket to fit perfectly.  Far too many guys get fixated only on how the jacket looks from the front.  No where does the full 360 degree view matter as much as it does when dealing with the hip and seat areas – get the whole picture right.

When it’s too tight two things occur; first being the jacket looses its fluidity as it gets caught up on the hips.  Secondly the vents gape open which is a clear sign to everyone that your jacket is flawed.  On the flip side when its too loose you can see a ‘wave’ of excess cloth on the side panel in front of the vents.  This leads to visual weight; particularly from the frontal view as a clear flare occurs in the skirt of the jacket.  In both cases subtlety reigns supreme – literally one to two inches in the overall circumference is the difference between a perfect fit or not.

fit in the seat

5. Get the body and sleeve lengths right.

It sounds simple enough but when I look around town these are two points that seem to be constantly missed – the body I can somewhat forgive but the sleeves I cannot.

The body is legitimately difficult because it is a combination of style and the proportions of your body.  In recent years fashion has leaned towards the cutting of a shorter jacket.  This is fine but it needs to be in sync with your proportions.  The traditional rule has always been that the jacket should cover your seat; keep this in mind as you think about whether or not you want a shorter more contemporary cut jacket.  One inch above your seat is proportional and fashionable while two inches is likely just plain short.  As for longer – regardless of your proportions I suggest you never go further than the bottom of your seat.

As for the sleeves there is no excuse to miss here as you must show cuff – between 1/4 and 3/4 of inch.  The reason is to create a hint of contrast at the wrist that combines with the shirt and tie at the front.  Failure to do so means the suit threatens to overwhelm the entire look – it’s akin to a wall of one color coming at the viewer.  The contrast softens the look and makes you look like you’re not wearing your older brothers clothes.

SleeveLengthPort

Don’t hesitate to get in touch if you have any questions – you can also set up a free appointment to talk some of these points through and to find out if we might be a good fit to work together.

Take care,

Michael

info@martinfishertailors.com