Category Archives: Fashion

5 Quick Tips For Buying Off The Rack…

Advice For Buying Off The Rack

The key is to know which aspects of a suit you need to get right from the outset and which areas you can tweak via the alterations route.  The idea that alterations can fix all flaws is in itself a flawed way of thinking.  Here are a couple of things to keep in mind:

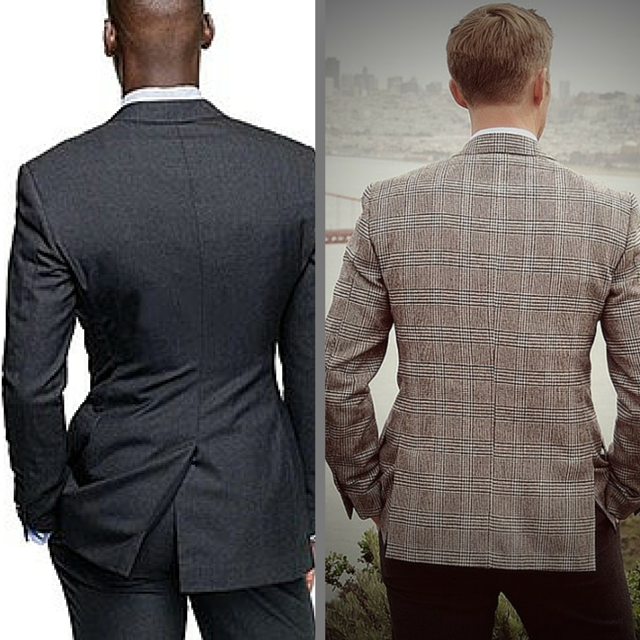
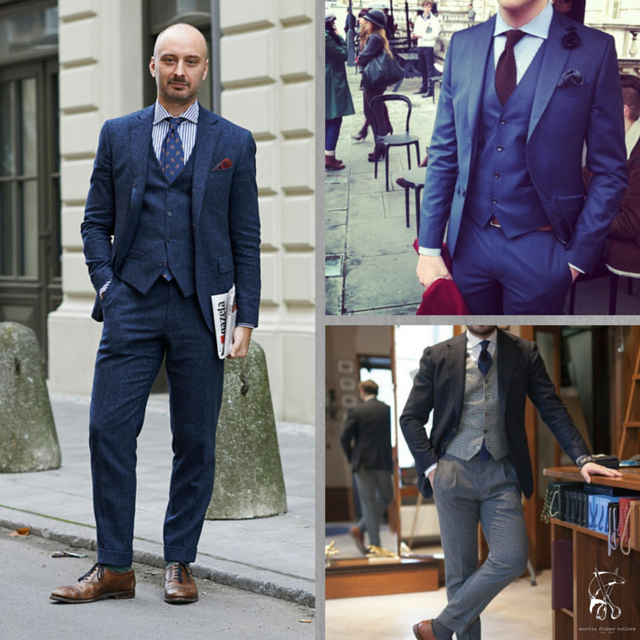
Get the shoulders right

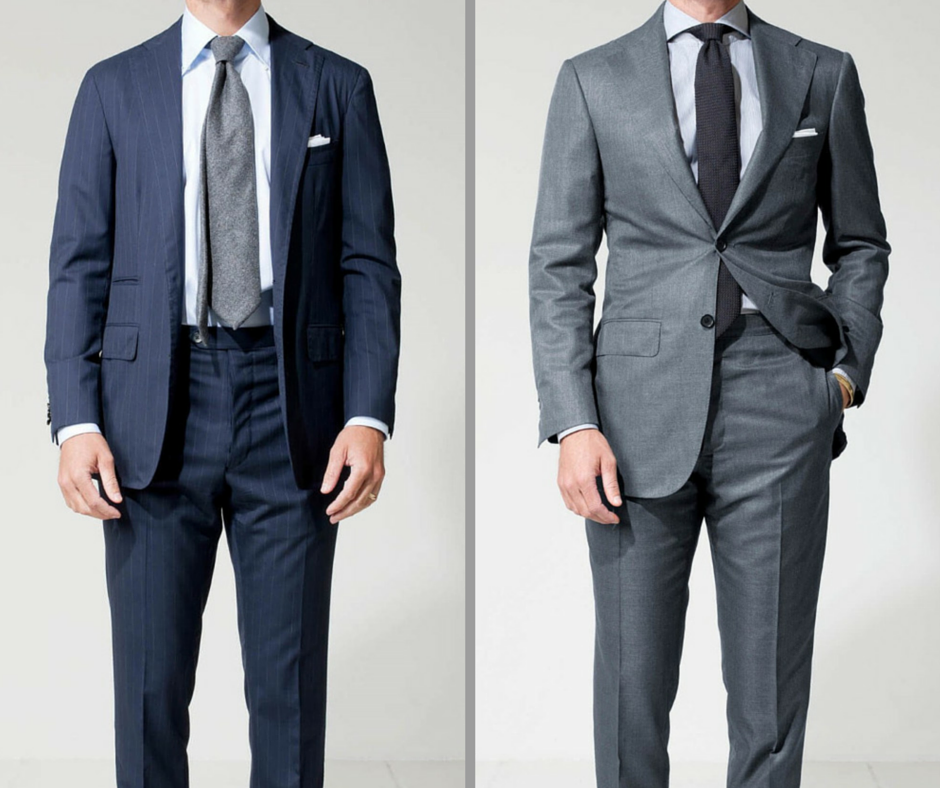
Both in terms of the width as well as the length over the top of the shoulder.  The width is easy – as you can see in the image below the shoulder seam needs to be sitting in the vicinity of your shoulder bone.  It can be slightly inside for a narrower appearance or slightly outside to give you a wider appearance – this visual manipulation is up to your eye and is based on personal preference.

20140903_141225

The length over the top is not discussed as often but is critical to understand for fit.  Imagine you’re squeezing a ruler under your armpit – the distance up and over the shoulder from one point to the other is the length we’re talking about.  Too tight and the lapels will buckle; too loose and you’ll be swimming in the jacket.  Your eye will see the difference but more importantly you will feel it – we’re looking for your body and the jacket move together in unison. No pulling, restriction or downward pressure on your shoulders/chest area; but equally no floating effect where the jacket moves independently of you.

Of the two – width can be altered.  That said it’s not cheap – removing and reattaching the sleeve is time consuming and getting it done right is crucial as the shoulders expression is so key to a jackets appearance.  If the rest of the jacket is dead on then consider it – if not walk away.  As for the length over the top – it’s not alterable so you got to get that right.

Get the front close

Be wary of the jacket that is “almost right” but has a lot of excess on the front in relation to the back.  This typically happens to guys who have a bigger back in relation to their chest.  The overall circumference of the jacket is right for their size but it’s the location of the fullness that is off.  Sales folk will often tell you that it can be taken in at the back seams to create a cleaner silhouette – sometimes this is the case but don’t always believe them.  No doubt the number one alteration error I see around town is the aggressively taken in back to compensate for fullness on the front.  All too often the result is a front that is still too big but now with a back that is clearly too tight.

Why is this?

It’s because the front of the jacket is pretty much set – the front is unalterable due to the buttonholes while the front seams can’t be changed due to the pockets.  What can be altered on the front though is the chest – we can take out up to ¾” per side without throwing off the fit of the sleeve.  So be careful – if you do have some excess in the back then you can “pull around” the front by removing that excess.  If the pulling around technique gets the front close enough for you to be happy with then go for it – if not then simply walk away.

Be wary of length

linkedin post - insta

There are two versions of this – one can be saved while the other cannot. I’ll start with the save – this occurs when the jacket fits properly but the style is simply longer than you desire.  By this I mean the shoulder and chest fit, the button stance is in the right location as are the lower pockets.  In this case it’s relatively easy to remove length from the bottom of the coat – the only factor to keep in mind is the balance of the coat thus don’t overdo it and remove too much length.  This is a common alteration as a shorter jacket is the fashionable look these days.

In terms of the non-save – this occurs when the jacket is too long in the body for your height.  By this I mean the button stance and lower pockets are sitting too low.  In this case the length needs to be removed from the mid-point of the jacket which is obviously not possible.  I’m afraid simply lopping it off from the bottom will not solve the problem.

Get the rise right

The rise in a pair of pants is crucial – it dictates the look and feel of the pant but more importantly it’s crucial for comfort as well.  Certain body types require specific rises – be it due to your height or your physique.  If the rise and resulting fit isn’t right then walk away and find a different style of pant as it’s unalterable.  Check back next week for a full breakdown on all things pants.

Be specific

If you’re able to avoid and/or navigate some of the situations discussed above then you’re in the position to make a purchase.  At this stage you can get as specific as you want – how specific of course depends on the amount you’re willing to spend on alterations to get things perfect.  Here are the key finishing alterations:

Square shoulders – OTR jackets are cut to accommodate as many body types as possible but where they will miss is if your shoulders are too square.  In this case you’ll have excess cloth bunching up at the base of your neck under the collar – it’s relatively common and easy to deal with.

Clean the chest up – The fit across the chest is crucial for both comfort and the overall silhouette.  A lot of guys elect to go with too much room adding a lot of visual bulk while actually making the jacket more uncomfortable to wear.  As stated above we can take away up to ¾” on either side – it’s relatively common and easy to deal with.

Clean the button stance up – Be it giving a little or taking a little away.  Try not to follow the fashion trends of today and have the button on the verge of popping off due to stress.  Conversely don’t follow the old adage of being able to fit a fist between your belly and the coat itself.  Just measure yourself at the button stance level – the jacket should measure about 3-5” bigger than that number.

Slim the sleeves – A lot of brands are making improvements in this area but not all.  After slimming the chest and button stance nothing destroys the look more than blousy sleeve.  Nobody gains weight in their elbows and forearms so slim it up to sync with the rest of the jacket.  And as a reminder – always show ¼”- ½” of your shirt cuff.

Get the waist and seat right on your pants – Too tight looks bad and feels worse while too loose is just plain sloppy.  The waist should stay in place with no help – the belt being there for decoration only.  As for the seat – you will want about 2” of ease.  That means the pant should measure that much more than your actual measurement – a 40” seat needs a 42” actual measure on the cloth.

Taper the pants – It starts at the upper quad and needs to be smooth and steady through the knee to the hem.  My personal rule on the upper quad measure is that it should be 3-3 ½” more than your actual quad measurement.  Any less and comfort begins to be an issue; any more and you begin to have a lot of cloth below your seat.  To find this out – simply measure across the leg right at the bottom of the crotch level.  If it’s too tight/loose – get your tailor to open up the inside seam and add/take away on the back.  The knee should measure in the 18-20” range with a bottom hem in the 14-16” range.  Add an inch if you’re a bigger guy or you want to be more conservative.  The key here is to play a little – it will take a bit of trial and error to figure out what is right for your body and design sense.

Take care – and as always let me know if you have any questions…

Michael

info@martinfishertailors.com

Friday Style Debate: If you had one color combo for eternity which would it be?

fb fsd

Time to debate!

From my perspective these two combinations represent the first two purchases every guy should make.  Versatile in terms of adding other colors plus interchangeable as a way to refresh your look.

Given the choice of only one combination for eternity which would it be?

Let the debate begin…

Shoes Make The Man – How To Nail Your Shoe Game

Do shoes make the man?

That’s what they say.  As a statement this might be a bit over the top but undeniably shoes are absolutely critical in anchoring and finishing your look.  For me shoes are the most personal aspect of a man’s wardrobe.  Each guy has a few types and styles of shoe that he simply feels comfortable in – this is from both a physical stand point as well as from a style point of view.

In most cases we we don’t accessorize in the same way as women; as such shoes take on that role and allow us some freedom to express ourselves.  With that in mind I’m disinclined to say exactly what shoes you should own as it’s such an individual decision.  Instead I’ve decided to go over my shoes collection as a way to share what I think makes up a basic shoe wardrobe.

Dress Shoes

shoes 2 instag

I’ll start by addressing what you don’t see in the above image – a pair of black shoes.  I don’t wear black – be it clothing or shoes – simply because I find it too formal from a personal point of view.  That said I know many guys who wear primarily black shoes (and clothes for that matter) and they look great.  Like I said shoes are personal and a reflection of your own tastes. In my case I love the personality of a brown shoe and the different patinas that naturally form with them.

Before going further a note of caution – if you wear dress shoes in the work environment you need at a minimum two pairs of shoes.  A rest day between each use is crucial to increase the life span of the shoe.  While resting your shoes need to have wooden shoe trees inserted – this maintains their shape and absorbs the moisture, sweat and smells that your feet inflict on the shoe during each use.   With that in mind because I’m in a suit on a daily I keep four shoes in the rotation – that said all four aren’t used every week.

The Workhorses:

The two pairs in the middle are my day-to-day workhorses.  A classic brown blucher (second from right) and a mid-brown wing-tip (second from left) work for every look I need whether it be dressed up or down.  Both work as well with suits as they do being paired with a cotton trouser or dark denim.  This is where you should be spending as much as you can afford to.  I find the old adage that “you get what you pay for” to be particularly spot on with shoes.  The difference between a $150 shoe and a $250 shoe is massive – even more so when you jump to the $300 level.  The $250-300 shoes will last 10 years if cared for properly while at $150 you’ll be happy with a year.  At 2.5 uses a week you’re looking at 1,250 uses in 10 years – on a $300 shoe that ends up costing 24 cents a day.  Good value I’d say.

The Specials:

At the far right is my one-piece dark chocolate oxfords.  The style itself makes it my most formal shoes as does the color which is as close to black as you can get.  When paired with a midnight navy suit it’s as close as I need to be to a black suit/black shoe combination.  On the far left is my tan dress boot – by far the most casual of the bunch.  I’ll wear this with full suit from time to time but more often it’s used in a dressed casual role being paired with an odd jacket and trouser.

What’s missing?

A dress loafer something like below.

0c26c8eb0ef895b2967869ef6fe5f1e4

For the summer months it’s nice to have the option to go with or without socks.  The breeze hitting your ankles can cool you down substantially while making your suit look visually less heavy – personal opinion of course!

Casual Shoes

shoes instag

When you talk about individual preferences and style it’s in the casual arena that we see the most variety.  In my case I run the scale of dressy casual to fully casual – right to left as you can see.

Dressy Casual:

On the right are my casual dress boots – in mid brown at the far right and in olive green suede beside it.  Both boots are in the casual group mainly because of their rounded toe box.  The mid brown boot also has a Dainite waterproof sole as opposed to a traditional wooden one which also reduces its formality.  Both a very versatile – capable of being worn with suits in a pinch, to dressed casual all the way down to fully casual use.

The Bridge Shoe:

Undoubtedly the most versatile shoe in my entire collection is the brown leather loafer in the middle.  I call it the bridge shoe because it can be used in so many situations.  Paired with cotton trousers, a dress shirt and an odd jacket it is perfect for dress casual in the winter months.  At the same time though it’s just as comfortable being worn sockless with shorts and a polo shirt in the summer months.  Not many shoes can boast that level of versatility.  A quick note – this differs from the dress loafer because of the sole.  The dress version has a traditional wooden sole while this is version is the soft rubber.

Trainers:

Last is the trainers – everyone needs a few pairs of great trainers.  The navy leather New Balance are my winter go to – they pair with every possible pant including duty with suits when grabbing a post work pint or just walking home.  The grey Nike Free’s are my summer months go to – more often than not used with shorts though they also pair up nicely with light cotton pants for warmer evenings.

What’s missing?

I posted this image last week on my blog – the simplicity of a white leather trainer is hard to beat.  Notice that they’re paired with grey flannels in this case.  When you see the full image it’s actually a full suit – not exactly business appropriate but it looks great nonetheless!

Vans Sk8-Mid Vintage Fall Collection

I’d love to hear your take on this subject – comments are always welcome.

Take care – and as always if you have any questions don’t hesitate to get in touch.

Michael

info@martinfishertailors.com

Single-Vent Jackets – How To Put Your Hands In Your Pockets

Things to think about.

Another unintended post on vents today!  This time the inspiration was from another downtown walk – from The Landing in Gastown towards Howe and Dunsmuir.

The Mistake:

In this case I counted 4 guys walking with their hands in their pockets while wearing a single-vent suit jacket. In itself the hands in the pockets is not a problem – it’s how you execute the maneuver though that can cause trouble.

Below is an image of what a single-vent jacket looks like in relation to a two-vent jacket when viewed from the back with hands in the pockets:

insta2

Right off the bat you’ll notice that the two-vent jacket on the right looks much cleaner when the hands are in the pockets.  The back flap operates independent of the side panels thus your seat is always covered and there are no strains on the jacket itself.  With the single-vent on the left the vent gets pulled open – this both exposes your seat and creates an unnatural pulling effect on the back of the jacket right above the vent itself.  Furthermore you’ll also notice that right hand is not even in the pocket – if this was the case then the exposure of the seat and the pulling effect would be substantially worse.

The Solution:

It’s quite simple – always go for your pockets from the front of the jacket.  Start with your hands at the front opening and sweep back until you reach the pockets.  This way the excess cloth of the jacket is pushed to the back and the vent itself is never opened.  An added bonus is that it looks very clean from the front – judge for yourself:

insta3

An added tip – as you sweep the cloth back roll the front underneath itself.  This keeps your silhouette cleaner as it reduces the visual bulk above your pockets.

Take care – and as always if you have any questions don’t hesitate to get in touch.

Michael

info@martinfishertailors.com

How To Nail Dressed Casual In 5 Steps

blog post 2a (instagram grid)

Introducing Dressed Casual.

Vancouver is unquestionably casual when it comes to attire – the result being we perpetually feel on the verge of overdressing in a way you would never feel in Europe, New York or Montreal.  Suits are a daily ritual in certain sectors and remain appropriate in specific non-work situations but much more common is a dressed casual approach: especially in industries like advertising, technology, hospitality and real estate.  It’s a fully put together look but one that is firmly casual in its roots.

Oddly though the dressed casual look is way harder to pull off.  With a suit comes certain conventions that guide and keep you focused.  With dressed casual you’re walking a line between two styles – with this comes plenty of freedom and choice but more importantly ample opportunity to make mistakes.

Here are 5 keys to nailing the dressed casual look:

1.  Wear a jacket.

An odd jacket or blazer is the key to the dressed casual look – instantly you’re appearance is elevated a level.  Three keys in this:

The first is it’s an odd jacket – meaning the pants don’t match.  There should be no confusion thus the color, texture and pattern of the two need to be clearly different.  The second is cloth selection – smoother worsted wools are the most formal, flannels and textured wools are less so and then we have tweeds, linens and lastly cotton which is the most casual.  The last key is the jacket’s structure and length – a loose rule being the more unstructured and shorter the jacket the more casual it becomes so find the balance that works for you.

2.  Get the pants right.

Whether you’re wearing wool, cotton or denim it’s crucial to sync the fit of your pant to that of your jacket.  A jacket creates a long and lean silhouette – our pants need to do the same thing.  The most common error; too loose and too long.  We need room in the seat and quads as most of us sit for the bulk of the day.  What should be lost though is the bagginess that most guys wear from the knee down and the pooling that occurs on your shoe.  Trim it up.

3.  Wear a collar.

You would think this is obvious but I see a lot of jackets worn over t-shirts out there.  Without doubt a collar elevates your look to the next level – depending on execution it can lean towards a more formal look or it can be quite casual.  A warning though – a polo shirt doesn’t always count.  There is what I refer to as a dress polo and then there are golf shirts.  If your polo is like the one below then go ahead.

blog post

4.  Mix and match.

This refers to texture of cloth, layers and a little bit of color – notice how that is listed last.  Color is often pushed as the first way to spice up your look – I couldn’t disagree more.  When used well color can definitely add to a look but it’s the blending and layering of different textures that makes things visually appealing.  In the images above and below you see exactly that – a cashmere sweater under a textured wool, flannel paired with a smooth worsted wool, cotton with a dressed up denim.  It’s the subtlety that is so crucial – play around a bit and learn what looks best to your eye.

5.  Shoes make the man.

The saying might be a bit over the top but shoes absolutely complete the finished product.  And with trimming down your pants and removing the pooling at your ankles your shoes are now prominently on display which means they cannot be an afterthought.  Suede chukkas, classic lace-ups, loafers – the ones shown are a just few examples of the options available to you.  Look for a post next week when I’ll go over the range of shoes you need to have on hand.  At a minimum though – keep them polished and well loved.

Take care – and as always if you have any questions don’t hesitate to get in touch.

Michael

info@martinfishertailors.com

Remove your basting stitches!

Things to think about.

A bit of an unintended post today – but the stats dictate it!

The Mistake:

Over the course of a 10 minute walk this afternoon from Gastown to the corner of Dunsmuir and Burrard I managed to spot 8 suit jackets and 3 overcoats with the basting stitches still in place on the back vents.  Two friends walking together each made the mistake which led to my paying attention – apparently it’s more common than I thought.

If you’re unsure as to what I’m referring to – it’s the stitches that close the vents on the back of a jacket and sometimes on the cuff:

inst

Apologies for the photo quality – I pondered taking action shots but in the end felt it was inappropriate thus google images it was!

The Solution:

The reason for these stitches in the first place is to simply hold the vents closed and in place during shipping.  Once you’ve purchased the jacket you need to remove them to allow the vent to move and in doing so provide you with a greater ease of movement.  To do so simply use a seam ripper (found in any sewing kit) or standard home scissors to gently snip one corner and the thread will easily pull away.

Take care – and as always if you have any questions don’t hesitate to get in touch.

Michael

info@martinfishertailors.com


Friday Style Debate: Do you button up with a three-piece?

Time to debate!

Welcome to the opening post of a new weekly feature – the Friday Style Debate.

Each Friday will be style-based question and I’m looking to hear feedback as to which side of the debate you fall.  It’s a timely opener as recently I’ve made a lot of three-piece suits and every time the question is the same:

Do I leave the jacket open or do I button up?

Here are few images in support of the peekaboo view of the vest while buttoning up:

blog post 1 (instagram grid)

And here are a few in support of letting the vest be on full view:

blog post 2 (instagram grid)

Let the debate begin…