Category Archives: Tailoring

Friday Style Debate: the ultimate summer fabric…

Time to debate!

FSD - mohair vs linen

With the heat finally descending upon us the goal has now shifted to remain as cool as possible. Looser weaved fabrics are the way to go – the looser the weave the more air will pass and cool your body down even on the hottest and stickiest days!

Two great choices – the wool mohair blend on left versus the linen on the right.  Both will keep you cool but the way in which they do it is very much different. The wool mohair will remain crisp and sharp due to the wrinkle-resistant nature of the yarns its made from.  Linen on the other hand will wrinkle and provide a much more casual, live-in appeal that many find charming.  Both are great in my books but as always it comes down to personal preference.

With that in mind – what cloth will you choose for your summer suit this year?

Let the debate begin…


Put your best foot forward (even if that means dressing the same every day)

Put your best foot forward.  

ba26ea5760930d6f2db135400e8c7e1a

Put one’s best foot forward

1. (idiomatic) To show oneself in the best or most positive way possible; to make a favorable impression.

Try to put your best foot forward at all times during a job interview.

It’s hard not to agree with such a sentiment – how each of us interprets this statement from a clothing perspective though will be considerably different.  What can be agreed upon though is that each time you depart the house you want to feel at your best.  Without delving too deeply into the psychology behind it the power of clothing to influence our feelings is undeniable; and that’s without even pondering the influence is has on others perceptions of us.

Always look + feel your best.

Take a moment and really think about the outfits that make you feel the best.  What do you wear for that critical meeting?  What is your favorite look when you’re going out for an evening? Most of us have “go-to” outfits for these situations.  Now analyze why those combinations work for you – is it the colors?  Is it the cut and fit of the clothes?  Is it a combination of the two?  Is there a lot of variation to the looks or do you gravitate to one particular style?

If you’re all over the fashion map that’s fantastic.  There is a reason that fashion is constantly moving forward and presenting potential new trends each season.  If that is who you are then enjoy the variety and have fun with the possibilities.

colorful

A signature look.

On the other hand if you’re consistently pulled toward a specific look and color scheme do not fear!  The fashion world – from stores, to magazines, to stylists – all try to make you feel badly for not being adventurous.  Don’t listen to them – figure out what works for you and knock it out of the park every time.  The only way to achieve a signature look is to actually take the time to develop one – here are a few who have done exactly that:

Gianni Agnelli

Gianni Agnelli

The Godfather of Style; Italian industrialist and owner of Fiat.  Undoubtedly the most influential style icon of those in the suiting world.  9 out 10 times he was in shades of grey though he throw in the odd navy to keep you on your toes.  Notice his signature look in the lower right – the watch worn over the cuff.

Prince Charles

The Prince of Wales

The undisputed king of the double breasted jacket; worn closed, open or the extremely difficult casual usage.  Considering he is royalty it makes sense that his tailoring is from Savile Row and is impeccable at all times.

Albert Einstein

Albert Einstein

The rumor – though unsubstantiated – was that he had a closet full of essentially the same suit; like Agnelli they were in varying shades of grey.  His famous quip of course was that he had more important things to do than figure out what to wear each day.  The approach served him well I would say.

It’s how you feel.

The concept behind the signature look is all about feel.  On a personal level I pretty much only wear navy and gray with touches of olive, brown and baby blue. When I go outside of this scheme I simply don’t feel as comfortable.  Other colors and combinations might look great on me but when I wear them I just don’t feel right.  As a result I’m not comfortable and thus there is no reason to step outside of my comfort zone.   That is the point of this article – having your signature look is okay and in fact promoted.

8/10 days I’m in navy or gray suit, a white, baby blue or baby blue & white striped shirt along + brown shoes and plain tie in navy, grey, silver, brown or green. The other two days would be olive or brown.  Those very curated combinations make me feel at my best that is the foot I want to put forward every day.

In the same way during the summer you’ll find me in a white polo or a white button up shirt. The shorts will be seersucker or grey cotton; the pants will either be navy or olive.  This is what makes me feel right.

Some will say this is boring; others will say it makes total sense.

Final thought.

I felt the need to discuss this concept as lately I’ve experienced many clients who have been almost apologetic for not venturing outside of their standard style and color schemes.  It made me realize that a lot of guys feel the power of the fashion marketing machine and needed a bit of reassurance.

At the end of the day it’s about a great fit, amazing fabrics and perfecting the details that make your clothes right for your lifestyle.  That’s what enables you to feel right and put your best foot forward each day.  If that’s boring – so be it.

As always please let me know what you think and if you have any questions or concerns – better yet book a free appointment and we can talk some of these points through and find out if we might be a good fit to work together.

Take care,

Michael

info@martinfishertailors.com

4 Keys To Perfect Balance (in clothing not life I’m afraid)…

This post picks up from our discussion last week on the differences between bespoke and made-to-measure clothing – in particular the importance of balance as it pertains to a great fitting garment.

When we talk about balance what we’re essentially discussing is how a jacket or pant hangs on the body.  Put simply the goal for any jacket is to have the side seams aligned vertically while the bottom hem of the jacket rests perpendicular.  Achieving this seemingly basic goal can sometimes be easier said than done based on the posture a person might have.  This is why the skill of reading the body in tailoring is so crucial; information that is then transferred into the pattern and ultimately into a perfectly tailored garment as the end result.

4 keys to perfect balance.

Is there a thing as a perfectly balanced posture?  Finding it in the real world is difficult but thankfully we have diagrams like below to show us:

Perfect Posture

On the left you see a perfect balance between the left and right sides of the body.  Key in this is that the shoulders and hips are at the same height on both sides of the body.  On the right side of the diagram we see a perfect balance between the front and the back.  Notice how we generally carry more of our body mass to the front side of the vertical plane; this is of course offset by the upper back and seat on the back side.

Unfortunately though most of our bodies simply aren’t this balanced and proportional.  More often than not we’re twisted to some degree and hold our weight in a forward or backwards angle.  The result is that we have to play with the balance of our jackets and pants to make our bodies appear straighter than they are.  To achieve this we need to address the four major balance issues.

1. Vertical Balance

When we talk about vertical balance it’s easiest to think about the two main pieces of a jacket – the front (green) and the back (red).  They start at the neck point and go down towards the hem the jacket.

perfectposture (3)

In a balanced pattern like we see above the front is typically 1″ longer than the back.  The greater length is due to the fact that it has to go over the chest before going down to the hem; whereas the back has less distance to travel over the blades in the upper back.

Where things start to go wrong for your basic balanced coat is when the posture changes.  I’ll explain what happens by using two common postures – an erect and a stoop.  As you can see in the diagram below with a stoop the head and shoulders roll forward; whereas with erect posture the head and shoulders shift back

erect and stoop

Two things happen as a result.  Firstly the neck point moves forward (stoop) or back (erect). Secondly the length required for the respective fronts and backs change.  In a stoop the back length needs to increase as it has to get over the blades.  At the same time front length needs to be shortened as it is a straighter line towards the hem at the bottom.  The exact opposite happens with an erect posture – the back length needs to shorten as it has the straighter line while the front needs to be increased as it has a longer way to go over the chest and then downwards.  (Apologies for the child-like felt lines!)

Here is a real life example of what happens to a balanced jacket when it gets put on someone with an erect posture.

Erect posture with short back

Ignore the red lines for a moment and look at how the jacket is sitting.  As the red arrow indicates the bottom of the jacket is kicking forward which is collapsing the back of the jacket on the love handles and seat area.  This also manifests itself on the frontal view as the fronts below the button stance start crossing over.

Why is this happening?  Because he is erect he needs more length on the front and less on the back.  To correct it we need to take about 3/4″ off the back and add it onto the the front of the pattern.  The result would be the red lines – the jacket would comfortably get over his chest and fall straight down on the front which would release the “kick effect” on the back thus pulling it off his seat and into proper balance.

2. Horizontal Balance

After dealing with vertical balance this should be a breeze.  We’re still talking about the relationship between the front and back but in this case it’s on the horizontal plane – see the diagram below:

horizontal balance

Again it comes back to posture – different postures alter the proportional relationship between the chest and the back.  At times it’s balanced, at other times we need to give more to the chest and take away from the back, while at other times it’s the exact opposite.  As you can see in the four diagrams there is different level of fullness on each side of the vertical line – we always need to take this into account when reading the body.

One other piece to keep in mind here – musculature.  Posture defines the proportional relationship but then the muscles add a next level as they expand and contract.  This leads to the inevitable discussion between tailor and client about how trim the cut should be.  Certain muscles need more room than others to expand – always keep that in mind!

3. Left vs Right

This is less a posture issue and more about the skeletal make up of the body.  In my experience as a tailor most of the bodies I work with are not proportional.  In most cases one shoulder will lower than the other as will one hip be higher or lower.  Add in sport/general life injuries and the fact that most of us have one side more developed (muscle wise) than the other there are a lot of little tweaks that need to occur to get a jacket or pant to sit in a balanced manner.

This is why you can play such a critical role in the made-to-measure or bespoke process. Nobody knows your body better than you.  You see yourself everyday in the mirror and with a little attention you will see these details.  With that in mind when you’re in a fitting I encourage you to mention these details – fact is as a tailor it’s sometimes hard to see all these skeletal issues when you’ve got clothes on!

4. Shoulder Angle

Last but not least is the angle of the shoulders.  I’m sure you’ve heard it before but the shoulders set the tone for how a jacket looks and feels.  Having the angle of the shoulder mirroring your body is critical to this process.  Here is what we’re talking about:

Shoulder angle

When the angle of the shoulders is off two main things happen; firstly if you’ve got square shoulders then a roll of excess fabric will occur at the base of the neck like this:

Collar-Roll-580x389 (1)

Secondly; when the shoulders are too sloped for your body then the armholes will be collapsed as you put downward pressure on them as they are located too high.  It will look like this – notice the stress marks coming from the neck towards the armhole:

sloped-shoulders

In both cases the angle from the neck to the shoulder point is moved either up (square) or down (sloped).  Equally important though is that the bottom of the armhole is moved as well to maintain the shape and size.

In Closing

These four balance issues are crucial for clothing that fits perfectly and perhaps more importantly feels like it’s not there.  As I said above if you’re going to a tailor take some time to analyze your body as it will assist in the process and get you closer to a perfect fit on the first try.  By the way if your tailor scoffs at your assistance then perhaps you have the wrong tailor.

As always please let me know what you think and if you have any questions or concerns – better yet book a free appointment and we can talk some of these points through together and find out if we might be a good fit to work together.

Take care,

Michael

info@martinfishertailors.com

Friday Style Debate: the right length for shorts…

Time to Debate!

Shorts

Not many subjects in menswear ruffle the feathers quite like the short issue.  There are always two distinct camps – those who feel they are never appropriate and those who feel there is always a time and place.  I am most definitely side with that latter camp – those who feel otherwise likely just have legs they’re not too proud of!

Which brings us to our topic today – in the event you do choose to wear shorts what is the best length?   Short, medium or long are the choices – let’s hear some opinions as to the why with this one.  Is it based on height?  Type of legs you have?  Type of footwear?  Socks verses no socks?  Overall feel of the outfit?

Lot’s to consider – let’s debate…

Introducing the low-high…

I attended the Jacques Herzog architecture lecture put on by the Vancouver Art Gallery last night.  Easily the best dressed crowd I’ve seen in Vancouver for a long time – a great range of styles and from different age groups.

This fellow caught my eye – a pretty solid example of the more casual low-high.  Well played!

casual high-low

Bespoke vs Made-to-measure – don’t be fooled by language…

Over the last week I found myself in three separate conversations around what constitutes bespoke suiting in relation to made-to-measure.  Unfortunately the context of these conversations was in response to the miss-use of the word bespoke by a few makers running around town as well as online.  Hopefully this post will clarify some of the confusion that is out there once and for all.

savile_row_gq_20jul11_rex_b

What is meant by bespoke?

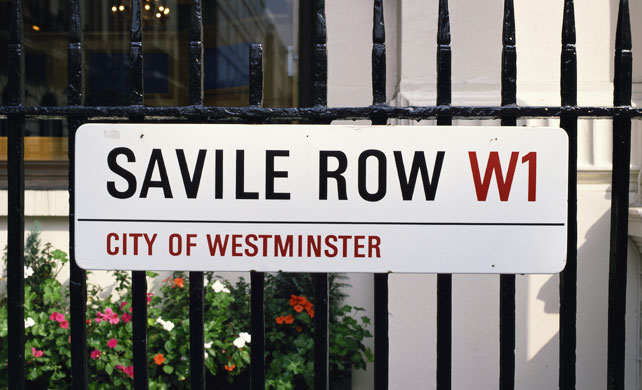
I’ll start with the word bespoke itself; it’s derived from the adjective, “bespoken”, meaning “ordered, commissioned, arranged for.”  In terms of bespoke tailoring it officially refers to a suit that is made on or around Savile Row in London’s Mayfair district.  Over the years The Savile Row Bespoke Association has gone to great lengths to protect the word and how it’s used in terms of describing and advertising suits.  Unfortunately this has been a loosing battle as the word gets shamelessly thrown around reducing its value and meaning from a craft perspective; one that has been practiced in that location to exacting standards for over two centuries. Simply put – if it’s not from Savile Row then it’s not real bespoke.

Don’t other locations in the world do bespoke though?

They do and they don’t.

I’ll start with the don’t.  Tailors of this level from other parts of the world don’t refer to what they do as bespoke simply because they know better.  For example in Italy – a location with an equally long and glorified tailoring tradition – they refer to the process as su misura; roughly translated as custom-made or tailor-made. Each area has their language to describe the process – in this way bespoke is specific to the English and Savile Row.

As for the type of suit that is made via this process – absolutely other locations in the world make a similar level of product.  The reality though is that not many makers in the world exist that are doing it at the level we’re describing when we talk about Savile Row or the best Italian tailors of Florence and Naples.  This is where things begin to get even blurrier; what goes into the process of making a suit and how it differs from level to level.  With that in mind we’ll start at the top.

What sets a bespoke level suit apart?

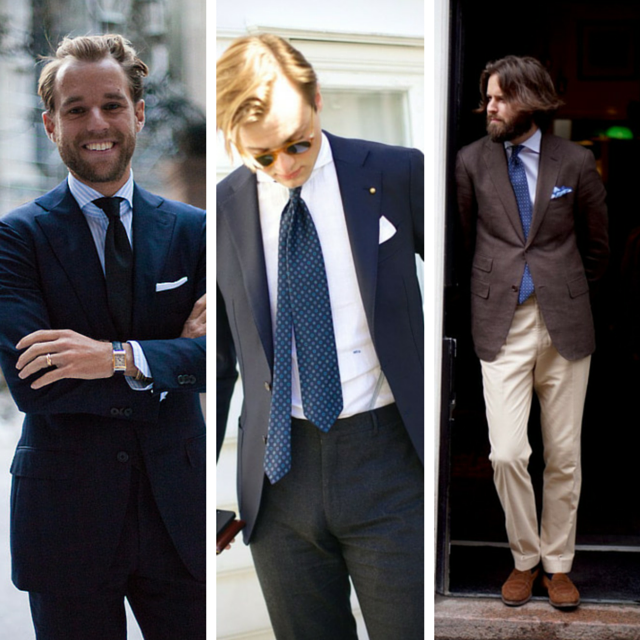
For the sake of clarity I will continue to use the term bespoke to refer to the top level of tailoring in the world – whether it’s the famous tailoring houses of Savile Row or the historic family-based artisans of Italy.

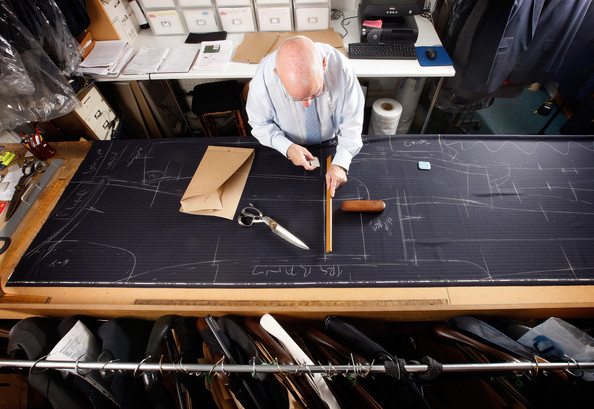
1. Individualized Patterns

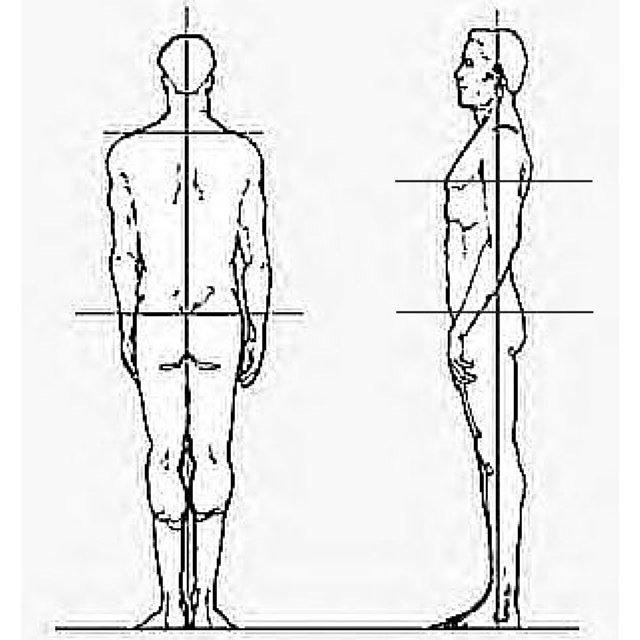
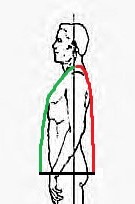
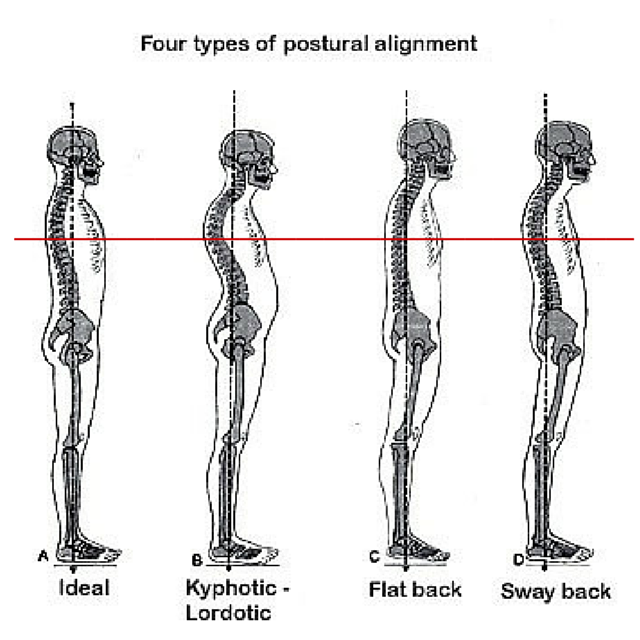
This represents the major point of difference from all other levels of tailoring.  At this level each individual client has an individual pattern developed from scratch. At the initial meeting the clients posture is observed and in combination with their measurements an individual pattern is constructed onto medium card stock paper.  As the client moves through the process changes are inevitably required; each of these – big and small – are recorded and the pattern is re-cut to represent what is happening with the actual suit itself.  As you can imagine this is extremely time consuming but more importantly it allows for a complete history of the process to be maintained for the maker to go back to as a guide.  It also provides a starting point for any further future commissions.

bespoke-the-mens-style-of-savile-row-book-rizzoli-style-4

2. Made In House

The entire process – from observation and measuring, to pattern development, to fittings, to the final construction of the suit – must occur in-house.  The level of detail and the overlapping nature of the process requires perfect unison between all people involved.  As such no aspect of the process can be outsourced to an off premise location.
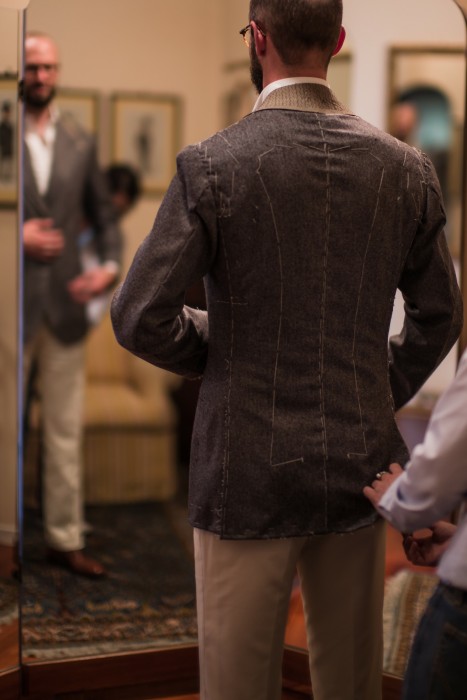
Bespoke+Tailors+Work+Savile+Row+Nkkx9bNwZFQl

3. Fittings

Typically there will be three fittings – beginning with the first fitting or “skeleton baste”.  This is where the basic parts of the suit (no collar or sleeves) are roughly sewn together using a basting thread – in essence this is to correct any major balance errors in the pattern.  Once the changes are marked on the cloth (and on the pattern) the basting threads are ripped apart and the suit is reconstructed for the second fitting stage

The second fitting – also known as the “forward fitting” – is where the body of the jacket is pretty much completed though the collar and sleeves will still be in the skeleton stage.  At this point the client will be able to get a real sense of how the suit fits and any small and specific changes are made to both the suit and pattern.

Caraceni-fitting-467x700

Next is either the “finish bar finish” stage or the final fitting.  The “finish bar finish” is where the entire jacket is complete minus the buttonholes.  This is one last moment to make sure everything is perfect before you cut holes into the cloth – of course once you hit that stage there is no turning back!  This is done when there is no rush or if the client cannot be seen for a final fitting.  As for the final fitting – it is of course the final check before the suit gets handed off for good.

4. Cost

Needless to say the first three points represent a lot of time and skill.  Not discussed is the fact that the actual construction of suits at this level involves an amazing amount of hand sewing in the finishing – at a minimum each suit being constructed will have over 50 actual man-hours put into it.  As such it’s expensive – opening price points will be around $5000 for a basic cloth quickly climbing to upwards of $10-15,000.

Then what is Made-To-Measure?

Simply put Made-to-measure (mtm) is the more affordable younger brother of bespoke.  It takes aspects of the bespoke process and combines it with a traditional factory system to create a more affordable option which still allows the client to achieve a great fit while also having control over the cloth and aspects of the design process.  In comparison suits will open in the $600 range and top out somewhere in the $3-4,000 range.

The most important distinction is that mtm suits are developed from existing patterns.  Just like the bespoke process the client is observed for posture and measured; in the case of mtm though that information is applied to a range of existing patterns from which the best suited pattern will be chosen.  This becomes the starting point from which the manipulations to create the best fit will begin.

Another critical difference is the role of the fittings as most mtm offerings don’t conduct this stage.  Because the suit will be constructed from an existing pattern it is far more efficient for the client to put on a “fitter garment” during the measuring stage.  Seeing how this garment works on the body provides some of the same insights that the first and second fittings allow for in the bespoke process.

Are there different levels of Made-To-Measure?

Absolutely – and this is where you need to ask the right questions of a tailor when you’re in the early stages of deciding if you’re a good fit to work together. Ultimately the tailor should bring these questions up with you but that won’t happen in all cases.  With that in mind here are what I see as the tow levels of mtm. Do note that these are my own titles so don’t be surprised if another tailor doesn’t refer to them in a similar fashion.

Full Made-To-Measure

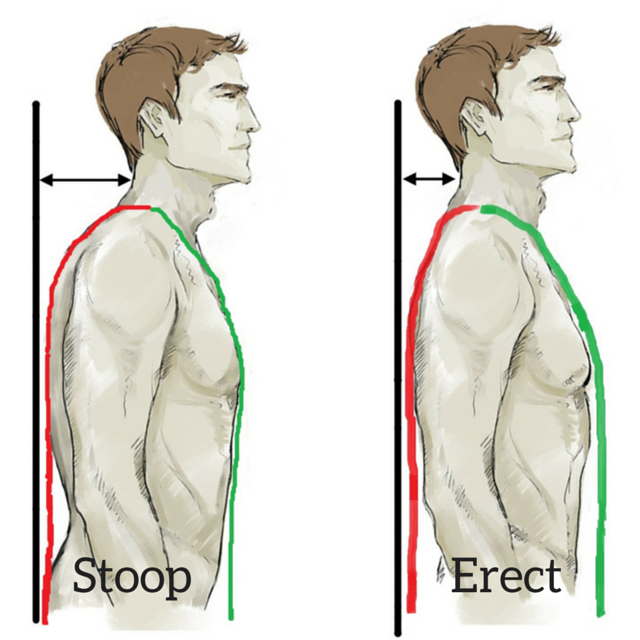
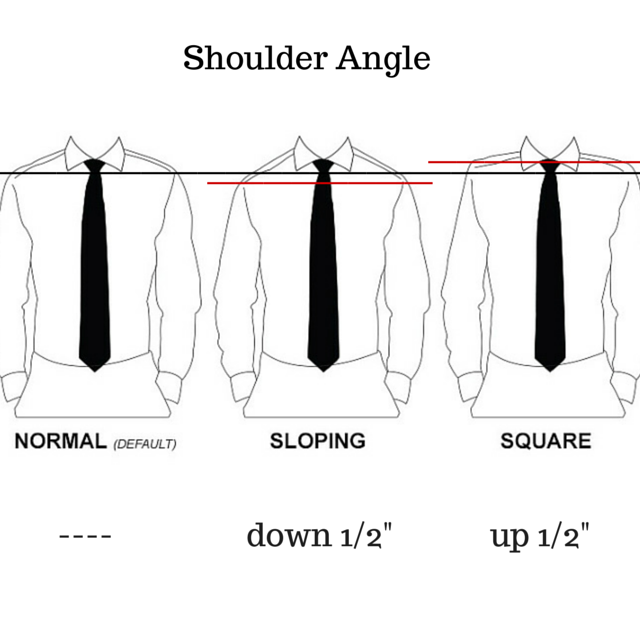
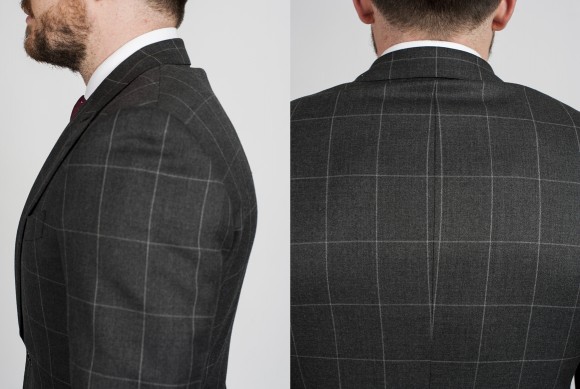
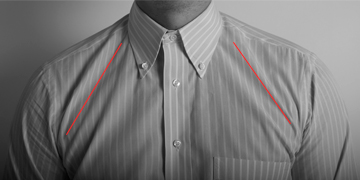
The first distinction is that the pattern is cut individually and all aspects of posture are able to be taken into account when manipulating the pattern.  This is the most crucial stage – be it in bespoke or mtm – as getting the balance of the garment in sync with the clients body is what custom clothing is all about.  There are four key balance issues that must be dealt with; the two major ones are vertical balance (relationship of the front and back from the shoulders down) and horizontal balance (relationship of the front and back in terms of circumference).  The two minor ones are the relationship between the left and right and then lastly the angle of the shoulders (regular, sloped or square).  If all of these factors are not taken into account then it cannot be considered a full mtm service.  On top of this basic details such as shoulder width, half back, width at button stance, length in the body and sleeve, pitch of the sleeves, etc are all taken into account. A little confused?  Don’t worry – next weeks post will focus on these four major and minor balance points in detail.

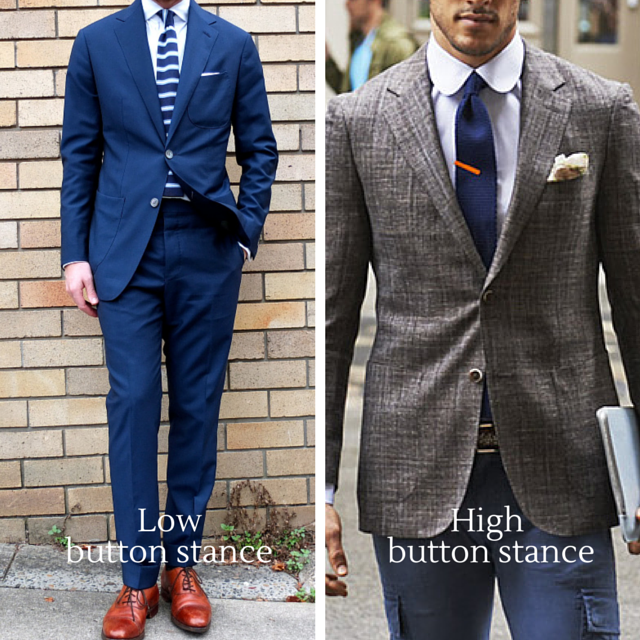
The second distinction – you’re able to make construction and design decisions.  By that I mean you get to decide if you want a structured garment or one that is more unstructured.  You also get to decide the details such as whether it is a single breast or double breasted jacket, the width of the lapel, height of the button stance, type of pocket style, the rise of the pant, etc.

And lastly – you have access to a full range of cloth selection from a number of different mills.

Half Made-To-Measure

At this level the options for dealing with different posture issues is greatly reduced.  The two major balance issues – vertical and horizontal balance – are not dealt with.  What is taken into account is the two minor balance issues plus the jacket is altered to your measurements at the button stance level and at the sleeve.

From a construction and design perspective more often than not there is a specific style and no deviation from that pattern is possible.  This type of operation is closer to a traditional factory setting thus the level of customization is reduced to increase efficiency and drop cost.  As for cloth – typically this type of service is restricted to the cloth that the maker of the garment has in stock.  What that means is a good selection is available but not nearly as wide a selection as at the full service level.

To finish.

I know there is a fair amount to chew on in this post.  The key take away – just because a company uses #bespoke doesn’t mean they produce a bespoke garment.  In fact I will guarantee you that they don’t.

As always let me know if you have any questions – better yet book a free appointment and we can talk some of these points through together and find out if we might be a good fit to work together.

Take care,

Michael

info@martinfishertailors.com

5 Keys To The Perfectly Fitting Jacket

Without a doubt there are a lot of posts on how to achieve the perfectly fitting jacket.  With that in mind I’m going to get a little technical to fill in some of the gaps; use these keys to get very specific the next time you’re purchasing a jacket whether it be with your tailor or straight off-the-rack.

A general point before we get going though; the perfectly fitting jacket should take your general shape.  The days of excessive structure and padding in the jacket are gone.  Instead the aim is to create a shape that softly follows the line of your body and enhances your natural silhouette as opposed to providing you with a new one.

5 Keys To The Perfectly Fitting Jacket

1. Get the shoulder and sleeve treatment right.

Firstly the shoulders set the tone for the jacket.  In terms of pure fit the shoulders of the jacket need to correspond to the natural width of your shoulders.  The seam should sit on or near the outside edge of the shoulder bone while the sleeve line falls smoothly downwards from there. Here is good example of this:

FSD2

And here are two examples to avoid.  On the left is a strained and collapsed upper sleeve due to the shoulders being too narrow; on the right is a protruding shoulder that ‘floats’ due to excess width creating a divot as the shoulder line falls downward.

perfectly fitting jacket

But there is some leeway that can be used to create a subtle visual manipulation.  It comes from finding the right combination between the angle of the shoulder seam and the type of sleeve that is chosen.

With the aforementioned shoulder bone as the guide we can set the sleeve inside, on or outside of this point.  The key in this is subtlety – we’re talking about a total shift of a quarter inch or so. The top image below is set outside thus creating an inward angle from the shoulder to the chest.  The bottom image is an example of an more inside set – the result being a straighter angle from the shoulder to the chest.

perfectly fitting shoulders

Why would we do this?  To manipulate how the shoulders look.  An outside set makes the shoulders look bigger while an inside set makes them look smaller. This is extremely helpful for guys with bigger mid sections – by setting the seam outside we make the shoulders appear wider in relation to the belly which visually slims the overall silhouette.  As for the sleeve – when it’s set inside we need to add fullness to the top of the sleeve so as to allow it to smoothly get over the deltoid muscle and not collapse as seen above.

2.  Get the chest and height of the armhole right.

These are dealt with together due to the fact that the two points come together at virtually the same spot.  The key piece of information though – the higher the armhole the better.  Feeling your armhole is not a bad thing – it should not restrict you in any way but feeling it something that is encouraged.

Why is this?  The higher the armhole the more independent the arms movement is from the rest of the jacket.  With a low armhole the sleeve actually attaches below the chest level thus every time the arms move it pulls at the area around the chest.  The result is a jacket that is constantly shifting and hence uncomfortable.

A secondary aspect of the high cut armhole is that we’re able to achieve a cleaner and trimmer chest as a result; this being due to the fact that the actual armhole itself is cut smaller.  It also allows for a longer line from the bottom of the armhole to the hem of the jacket.  We want this line to be as long as possible because it helps visually elongate the body.  It also enables a more slimming angle towards the button stance than if it began from a lower point.

Untitled design (5)

Apologies for the grainy picture on the left above – fitting that a bad picture is of a bad armhole. Notice the pulling that occurs with the arm slightly raised to enter the pocket.  Compare this to the image on the right which is perfectly clean despite the fact that his hand is raised chest high.

3. Get the button stance right.

The button stance is the narrowest point on the jacket hence it needs to correspond to the narrowest point on the body.  On most of us that means a slightly lower sitting stance; roughly 2-3 inches above the belly button at which point our love handles begin.  Keep in mind that lower is better as it creates a longer “V” from our collar down to the button.  A longer line visually elongates our bodies making us appear slimmer and taller.

low button stance

In terms of width – the button stance should be trim without being tight.  In days gone by the norm used to be that you could fit a full fist between your stomach and the jacket when it was pulled forward; nowadays it’s more like half a fist.  As a loose guide the jacket at the button stance should be between 3 – 4 inches bigger than your belly measurement.  Finding the exact amount is a personal choice – that said keep in mind that too much is sloppy while stress wrinkles from being too tight is simply bad.

4. Get the hip and seat right.

Perhaps the most overlooked aspect of getting a jacket to fit perfectly.  Far too many guys get fixated only on how the jacket looks from the front.  No where does the full 360 degree view matter as much as it does when dealing with the hip and seat areas – get the whole picture right.

When it’s too tight two things occur; first being the jacket looses its fluidity as it gets caught up on the hips.  Secondly the vents gape open which is a clear sign to everyone that your jacket is flawed.  On the flip side when its too loose you can see a ‘wave’ of excess cloth on the side panel in front of the vents.  This leads to visual weight; particularly from the frontal view as a clear flare occurs in the skirt of the jacket.  In both cases subtlety reigns supreme – literally one to two inches in the overall circumference is the difference between a perfect fit or not.

fit in the seat

5. Get the body and sleeve lengths right.

It sounds simple enough but when I look around town these are two points that seem to be constantly missed – the body I can somewhat forgive but the sleeves I cannot.

The body is legitimately difficult because it is a combination of style and the proportions of your body.  In recent years fashion has leaned towards the cutting of a shorter jacket.  This is fine but it needs to be in sync with your proportions.  The traditional rule has always been that the jacket should cover your seat; keep this in mind as you think about whether or not you want a shorter more contemporary cut jacket.  One inch above your seat is proportional and fashionable while two inches is likely just plain short.  As for longer – regardless of your proportions I suggest you never go further than the bottom of your seat.

As for the sleeves there is no excuse to miss here as you must show cuff – between 1/4 and 3/4 of inch.  The reason is to create a hint of contrast at the wrist that combines with the shirt and tie at the front.  Failure to do so means the suit threatens to overwhelm the entire look – it’s akin to a wall of one color coming at the viewer.  The contrast softens the look and makes you look like you’re not wearing your older brothers clothes.

SleeveLengthPort

Don’t hesitate to get in touch if you have any questions – you can also set up a free appointment to talk some of these points through and to find out if we might be a good fit to work together.

Take care,

Michael

info@martinfishertailors.com


Introducing the high-low style…

After spending a few days in Los Angeles last week I was reminded that it is one of the few major cities that is equally as casual as Vancouver. Don’t get me wrong; it’s most definitely a fashionable city but one that finds its voice from a very laid back place.

We in Vancouver share a very similar fashion DNA – comfort more often than not takes precedence though we’re looking to be on point and maintain a put together aesthetic.  Enter the high-low style.

What is the high-low style?

The high-low style is a concept were you take a fairly dressed up look and reduce its formality by pairing it with one or two distinctly casual pieces.  The most common method is to take a suit as the base and then reduce by way of your footwear – particularly via trainers.  The second element is often more subtle as can be seen in the images below.  On the left it’s the fact that he forgoes the tie yet buttons-up.  The hat also brings the look down one notch further still.  The fellow on the right uses a short sleeved cotton dress polo (a polo shirt with a dress shirt collar) in the place of a dress shirt to the same effect.

The high-low look

The key with both of these looks is that they aren’t far off being elevated back up the formal scale.  Change out the trainers for leather lace-ups and both guys are essentially back; add a tie to the guy on the left and he’s ready for the boardroom.

The concept came to my mind years ago as a way to describe how European women effortlessly walked this line; an aesthetic that was loosely referred to as casual chic at the time.  For me it was the ultimate because while it was clear that they weren’t trying to be dressed up they were most definitely fully put together.  This is a subtle but crucial difference.

Women's high-low style

Dressed up verses put together.

With menswear when you’re dressed properly it really comes down to nailing all the details.  A crisp, perfectly fitted suit; the polished lace-ups that perfectly compliment the color of the suit;  the socks, tie and pocket square that compliment both yet add a hint of punch to the look. Each individual piece needs to sync with one another and seamlessly bring the outfit together.

The high-low turns this on its head by implementing the one or two pieces from an entirely different stylistic place.  In the end it’s the lack of syncing up that adds visual interest and personality.  It’s completely put together and thought out though the feel and the intended messaging is totally altered.

Why do we use the high-low style?

For me it was the desire in my early twenties to go against my naturally preppy appearance.  I used trainers and sportswear pieces to change the feel – the goal being to look put together and fashionable but not overly polished.  Twenty years on and its still playing the same role for me in certain situations.

The same goes for Vancouver as a city – and while we’re at it Seattle, Portland, San Francisco and Los Angeles.  We’re not the East Coast nor are we anything close to Europe.  We’re constantly wary of being overdressed and searching for ways to reduce formality.  The high-low style fits our scenario perfectly – thoughtfully put together but with a laid back west coast sensibility.

Loose rules.

Unstructured is easier.

There is a lot of buzz right now about unstructured jackets which is odd considering the Italians have used them for decades.  With a warmer climate the idea is to reduce as much excess bulk in the jacket as possible; removing a layer of canvas, reducing or remove padding in the shoulder all together and perhaps eliminate the lining.  This instantly gives a softer look and lighter feel while maintaining a sharp silhouette.  This is more casual in nature and simply more comfortable which is crucial in achieving a successful high-low.

Remember you’re not really wearing a suit.

If you were then you’d have proper dress shoes on and we wouldn’t be talking about the high-low!   With that in mind think of it as though you are wearing the pieces of a suit as opposed to wearing a suit itself.  It’s a subtle though very important distinction.

high-low style (1)

As such feel free to un-tuck your shirt, play with the length of your pant hem, pair it with a bowler hat – generally express yourself any way that feels right.

When wearing a tie it’s all about the fabric.

Flying in the face of convention is an element of the high-low style.  That said you need to know where you can push the rules and where you can’t.   The tie creates a dangerous scenario – look at the two images below:

suits with trainers

I won’t mention the magazines that promoted these looks but essentially they said it’s okay to wear trainers with fully put together suit and tie looks – I disagree. The above images are of suits made from smooth worsted fabrics which represent the pinnacle of formality.  Simply changing out the shoes doesn’t achieve a successful high-low – if anything it makes a bit too try hard.  Avoid at all costs.

The images below however are a different case.

high-low style with tie

The difference is in the cloth – these two suits being made from cotton.  By reducing the formality of the cloth in the base suit you’re then able to play the high-low game while choosing to go with a tie.

Play around.

In the end it’s about delicately walking the line between the two levels of formality.  How you do that comes down to your personality as well the context that you’re dressing for.   The message you’re trying to promote in the tech sector is completely different than if you’re an advertising executive which is different still if you’re in the entertainment business.  The key is that you read the level of formality required for you field and start to play with it until you find something that works for you.

No doubt the high-low style takes a bit of trial and error and is higher on the difficulty scale than a lot of other looks.  Don’t hesitate to get in touch if you have any questions – you can also set up a free appointment to talk it through and see if we might be a good fit to work together.

Take care,

Michael

info@martinfishertailors.com

The Odd Suit In Relation To The Odd Jacket…

I’ve received a bunch of feedback from last Thursday’s Odd Jacket post and as a result a bit of clarification and further explanation is in order.  A lot of the questions and comments centered on the use of a suit as separates and if that could be considered an odd jacket in itself.  With that in mind I introduce the concept of the odd suit.

What is an odd suit?

An odd suit is formed when you take two suits, split them up and then wear them in combination with each other.  The key factor in this is that the fabrics of the two suits have to be very similar to one another for it to be termed an odd suit.  The obvious benefit is four looks out of two suits – as you see below it’s another reason why a basic navy and grey should always be your fist two purchases:

N + N-G

1) Navy suit                                                        2) Navy jacket with grey trouser

Grey + G-N

3) Grey suit                                                        4) Grey jacket with navy trouser

Here are some other options in terms of colors and types of cloth:

odd suit

Where does the odd suit sit on the formality scale?

The odd suit sits in the second position in terms of business norms.  The full suit on the left is obviously is the most formal option while the odd jacket and trouser look on the right sits in the third position.

formality scale

Why would you choose to go with the odd suit?

The first reason is practicality and is important for those readers who are building their business wardrobe on a tight budget.  For those starting out often two suits is all that they can afford; two suits with four looks allows you to make it through the work week without having the same look twice if you’re office is dressed casual friendly on Friday.  Keep in mind the focus should be to arrange your looks so that the same pants are not worn on consecutive days – this is crucial for extending their life.  We don’t worry about the jacket in the same way as it usually is hanging on your door for most of the day.

Beyond practicality I have two main reasons that I like to go with the odd suit in certain situations.  The first is because it’s slightly less formal than a full suit. Depending on your profession or the context of a given meeting sometimes a full suit sends the wrong message. An odd suit fits the moment where you need to be perfectly put-together yet you don’t want to overpower the situation.  On a personal level I will often go with the odd suit for meetings with clients in the creative fields – be it marketing, advertising or design.  These environments are slightly more casual and as such require a look that is slightly turned down in relation to a law or accounting firm.

958592ad263cd06d825f8c62e90edec4

The second reason is visual interest.  In the standard business outfit you have 6 elements – jacket, pant, shirt, tie, pocket square and shoes.  The most dominant aspects are the jacket and pant; by using two colors in the base we have more options in terms of multiple color combinations.  Another way of looking at it; the full suit is no-nonsense simplicity whereas the odd suit is all about creative opportunity.  The image below is an example of this  – Maciej from Zaremba in Warsaw in fact takes it to the next level by introducing a third base element with the vest.  It was visually interesting enough that he chose to forgo the pocket square all together!

tumblr_ni7wumAI2C1rm9sjto1_500

At a minimum it gives you a touch more freedom to express yourself – play with it and see what feels right.  As always I look forward to hearing from you. Perhaps more than any other post I’d love to see what odd suit combinations you wear on a daily basis – please feel free to send them in!

Take care and thanks for reading.

Michael

info@martinfishertailors.com